Celestial Navigation Session #3
In the first session of Celestial Stories we discussed the coordinate system and units of measure. In session 2 we affixed protractors to our telescope mount to serve as setting circles to indicate and measure the pointing angles. In this session 3 we will fill out the form for analysis and sextant sight reduction calculations. Please understand that in practice these procedures are a bit more complex than described in these short stories. Celestial navigation is easy to learn, but may be difficult to master.


Many authors of textbooks have created forms to escort the navigator through the procedure for sight reduction. These texts are usually copyrighted so the forms may not be copied even for personal use. However there are free forms on the Internet. We can easily create our own forms. The sequential procedure to be followed for sight reduction cannot be altered, lest you get the wrong answer and be lost!
This session will use the forms SR-96a, SR-96b and CLS-98 provided by the United States Power Squadrons that they use in their Celestial Navigation course. Those interested in learning Navigation in detail may join the Squadron to complete the full celestial navigation education program. After filling out the forms we do some analysis and then prepare a plot to finish the sight.
Each earth hemisphere has slightly different rules by convention. The observer's latitude north is positive (+) and latitude south is negative (-). Longitude west is positive (+), and longitude east is negative (-). Declination north is positive (+) and declination south is negative (-). If both latitude and declination are the same sign, then they are called "Same". If opposite sign then they are called "Contrary".
Using the form SR-96a we enter our initial data in sequential order. In the upper center we enter our initial site data name of celestial body and our Dead Reckoning (DR) or GPS latitude and longitude position. In the upper left we enter our recorded sight average time, clock corrections, and then derive the GMT (UT).
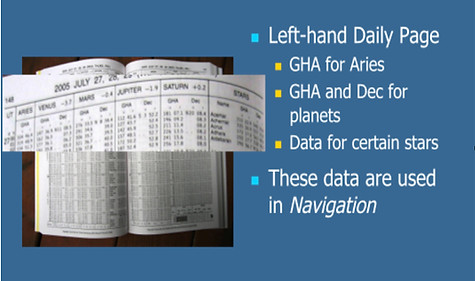

The best reference of celestial data is the inexpensive annual Commercial Edition Nautical Almanac. The Nautical Almanac is arranged three days to each page, with the Greenwich Hour Angle (GHA) of Aries, the GHA and declination of visible planets, sun, and moon for each hour of the day. At the bottom of each column are the v and d parameters to compensate for the rate of change in GHA and declination. When sighting on the Sun, Moon, or planets, extract the GHA hourly value directly. Increments and corrections are provided at the back of the almanac for the minutes and seconds with v and d of the sight time. These corrections are needed as nearby solar system bodies coordinates relative to earth motion change continuously. If curious about this, refer to the science of the analemma and the solar system.
Once we have the best average measure of the chosen celestial body height above the horizon using the sextant readings and times, we look into the Nautical Almanac and extract the GHA for that sight hour value of the body, and its' declination, then extract the correction for the minutes and seconds, including the v and d corrections, which are then added to the hour values of GHA and declination. To get the LHA of the body we subtract our longitude from the total GHA. Enter these values on the SR form.
We now have our three coordinates: our latitude, LHA and declination of the body. With these three values using our setting circles we can point the equatorial mount telescope to that body.
With the advent of computers we can complete the solutions to the equations by incrementing the three coordinates as whole numbers and tabulating the results. These tables are published in 3 versions: NAO sight reduction tables included in the almanac, Ho-249, or Ho- 229 which we can choose to use, based on the ease of use, and accuracy required. These tables are available free from the web, or can be purchased in book form from catalogs of navigation supplies. Instructions for use of these tables are included in each table's text.

To determine the alt-azimuth mount pointing angles and to do navigation, we now must determine calculated height Hc and azimuth relative to true north (Zn). To do the calculation for Hc and Zn we can go two ways; do the math or look up the solution in tables.

If we have a GPS in our pocket, or we have no GPS but just a predicted position (DR) we could complete the solution by the equations on the bottom of form SR-96a or b using the best values we have of latitude and longitude, with resulting LHA, and declination. Enter the values in degrees latitude as always positive (+), LHA directly, and declination as (+) if "Same", or (-) if "Contrary". Solve the trigonometry equations as a series of button pushes on the calculator to obtain calculated values body height (Hc) and azimuth (Z) relative to the hemisphere. If not mathematically inclined, have a friend write down the buttons sequence in the correct order for you to follow.
If we do not wish to run the mathematical solution, we can just look up the tabulated values with our three coordinates. To enable table look up we choose a latitude and longitude as an assumed position (AP) nearest our DR such that the latitude, LHA and declination are whole numbers. We look up the values for Hc and Z. Then using the back page of SR-96a or b as required, apply corrections for the difference in Hc and Z caused by use of whole numbers for declination. The correction for the use of latitude and LHA as whole numbers is compensated for when we do the plot on CLS-98 by plotting from our AP.
With either the math or table solution resolve Z to direction true north (Zn) following the rules for LHA on the SR-96a form. Repeat the above process for 2 or more celestial bodies. With Hc and Zn, using our setting circles, we can point the alt-azimuth mount to any one of the bodies.
Select bodies for navigation greater than 30 degrees azimuth apart for the best sights. With at least two bodies we can complete the plot CLS-98 to determine or confirm our actual latitude and longitude.
In my next story #4 I will explain the completion of the SR-96a and plotting procedures for CLS-98. I then will describe some interesting diagrams to clarify our understanding of the present celestial sphere.


End of Session Three


